Fixing the Hydrow’s Stuck Drag: An ESP32 Solution#
I’ve owned a Hydrow rower for a few weeks now.
One of our kids has one and likes it - It’s a beautiful piece of equipment—the streaming classes are engaging, the build quality is solid, and when it works, it delivers one of the best rowing experiences available outside of actually being on the water.
So this one appeared on Facebook marketplace and I decided to grab it.
But mine wasn’t working properly.
Ever. It was just too hard!
Either I’m really weak or something was seriously wrong with it.
The Problem#
The Hydrow uses electromagnetic drag. Unlike air or water rowers that create resistance mechanically, the Hydrow passes current through coils near the flywheel to create an adjustable magnetic braking force. It’s elegant when it works—smooth, quiet, infinitely adjustable from the touchscreen.
Mine was stuck at 100% drag. Every stroke felt like rowing through concrete. The software showed different drag levels, but the hardware wasn’t listening. The coils were getting full power all the time.
The unit was out of warranty, and the fix would cost nearly as much as it cost me!
So I did what any nerd would do: I opened it up.
Understanding the System#
The Hydrow’s drag system is straightforward once you trace the wires:
- A 48V power supply feeds two electromagnetic coils
- The main control board switches current to these coils using PWM (pulse-width modulation)
- Higher duty cycle = more current = more magnetic resistance = more drag
- The board’s switching circuit had failed in the “always on” position
The coils themselves were fine—about 12Ω each. The power supply was fine. The failure was in the control board’s output stage, and those surface-mount components weren’t something I was going to rework.
But I didn’t need to fix the board. I just needed to replace its one broken function: switching current to the coils.
The Solution#
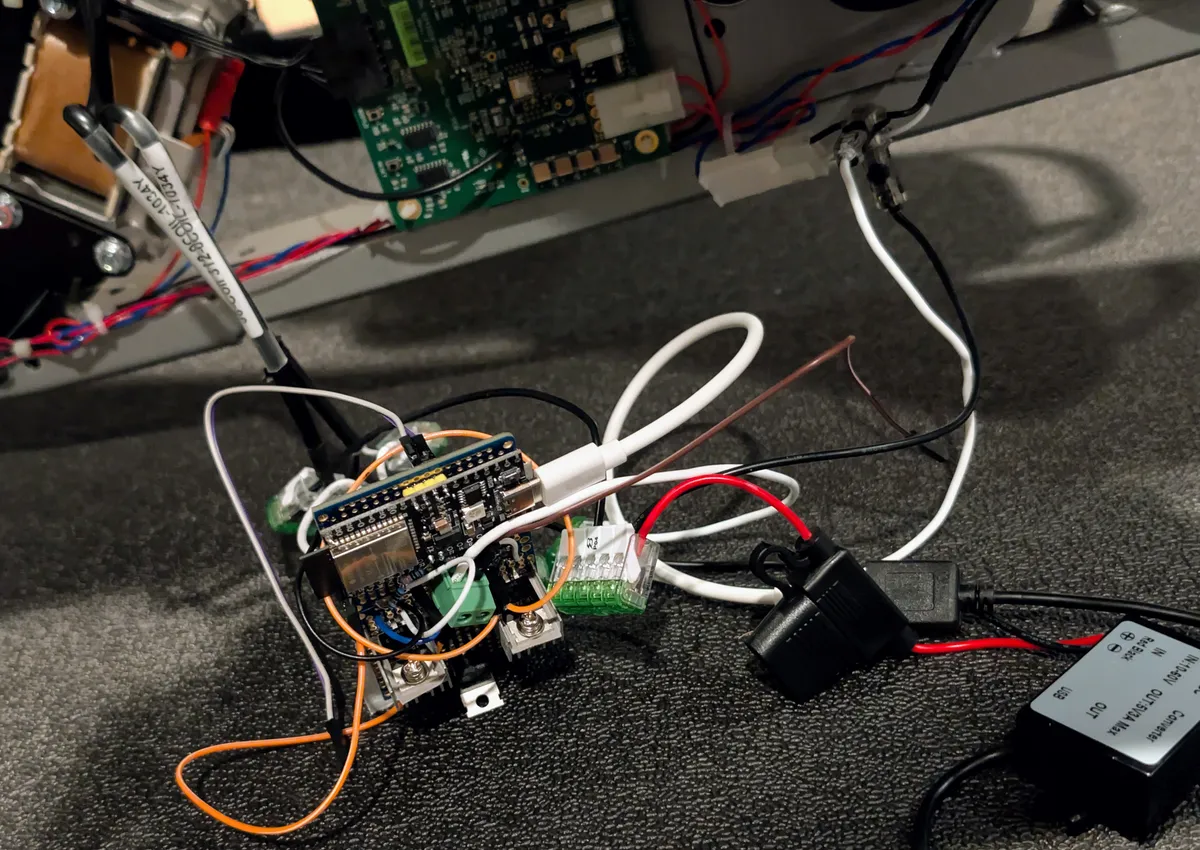
An ESP32 microcontroller with a couple of MOSFETs could take over drag control entirely. The original board would still handle everything else—stroke detection, cadence, the display, connectivity to Hydrow’s servers—it just wouldn’t be controlling the coils anymore.
Details, schematics and code are all here
Parts List#
| Component | Purpose | Cost |
|---|---|---|
| ESP32 DevKit | Controller + WiFi | ~$8 |
| 2× IRLZ44N MOSFETs | Switch coil current (logic-level, no driver needed) | ~$3 |
| MBR30100CT | Dual Schottky flyback diode | ~$2 |
| 2× 330Ω resistors | Gate current limiting | ~$0.10 |
| 2× 10KΩ resistors | Gate pull-downs | ~$0.10 |
| SSD1306 OLED (128×64) | Local display | ~$6 |
| 10K potentiometer | Manual drag control | ~$2 |
| Perfboard, wire, heatsinks | Assembly | ~$5 |
Total: under $30.
The Circuit#
The concept is simple low-side switching:
+48V → Coil → MOSFET Drain

MOSFET Source → Ground

MOSFET Gate ← ESP32 GPIO (via 330Ω)
When the ESP32 drives the gate high, the MOSFET conducts and current flows through the coil. PWM the gate signal, and you get adjustable average current—adjustable drag.
The flyback diode (MBR30100CT) is critical. Inductors don’t like having their current interrupted suddenly—they’ll generate a voltage spike that destroys your MOSFET. The diode clamps this spike by giving the collapsing magnetic field somewhere to dump its energy.
The MBR30100CT is a dual diode with a common cathode, which simplified wiring. Center pin goes to +48V, left pin to Q1’s drain, right pin to Q2’s drain.
Wiring to the Hydrow#
This was the trickiest part—figuring out exactly where to tap in:
1. +48V source: Found on a blue wire feeding the coils. Measured 48V to chassis ground.
2. Coil connections: Each coil had a 2-pin connector going to the original board. I unplugged these entirely. Each connector has two wires—one goes to my +48V rail, the other goes to my MOSFET drain.
3. Ground: Chassis ground ties to my controller’s ground rail.
4. ESP32 power: Completely separate—USB power. Don’t try to run logic from the 48V rail.
The key insight: I’m not tapping into the middle of the existing circuit. I’m disconnecting the coils from the original board entirely and running them through my own switching circuit. The original board still “thinks” it’s controlling drag—its outputs just aren’t connected to anything.
ESP32 Pin Assignments#
| Pin | Function |
|---|---|
| GPIO25 | Coil 1 PWM |
| GPIO26 | Coil 2 PWM |
| GPIO34 | Potentiometer input |
| GPIO16 | OLED SDA |
| GPIO17 | OLED SCL |
The Software#
ESPHome made this trivially easy. The configuration defines:
- Two LEDC PWM outputs at 25kHz (above audible range—more on this later)
- An ADC input for the potentiometer
- I2C for the OLED display
- A Home Assistant number entity for remote control
- Preset buttons for common drag levels
The display shows current drag percentage, whether control is local (pot) or from Home Assistant, and WiFi status. Simple but functional.
output:

- platform: ledc

pin: GPIO25

id: coil1\_pwm

frequency: 25000 Hz

- platform: ledc

pin: GPIO26

id: coil2\_pwm

frequency: 25000 Hz
The full ESPHome configuration is about 200 lines and available in the GitHub repo linked below.
The Gotchas#
PWM Frequency Matters#
My first test used 5kHz PWM. It worked—but the coils screamed. Electromagnetic coils vibrate at the PWM frequency, and 5kHz is right in the most annoying part of human hearing.
Bumping to 25kHz moved the noise above audible range. If you have particularly good high-frequency hearing, try 30kHz.
Wire Gauge Matters#
The coil current paths need 18AWG or heavier. The ESP32 signal wiring can be 20-22AWG. I used the existing Hydrow wiring where possible—it was already appropriately sized.
Pull-Down Resistors Are Essential#
When the ESP32 boots, the GPIOs float momentarily before your code runs. Without pull-downs on the MOSFET gates, that floating voltage can partially turn on the MOSFETs—energizing the coils unexpectedly. The 10KΩ pull-downs keep the gates at 0V until intentionally driven high.
Heatsinks on MOSFETs, Not Diodes#
At high drag levels sustained for a full workout, the MOSFETs will warm up. Small TO-220 heatsinks are cheap insurance. The flyback diodes stay cool—they only conduct briefly during each PWM cycle.
Calibration#
After installation, I needed to correlate my 0-100% scale with the Hydrow’s native 104-220 drag range.
Through testing, 71% on my controller equals 104 on the Hydrow’s native scale—my preferred setting for steady-state rowing.
The relationship isn’t perfectly linear because electromagnetic drag has nonlinear characteristics, but it’s consistent enough that I can dial in the feel I want.
Integration with Home Assistant#
Because this runs ESPHome, it automatically appears in Home Assistant. I can:
- Adjust drag from my phone before getting on the rower
- Create automations (morning workout routine sets drag to my preferred level)
- Log drag settings alongside workout data
- Control it via voice assistant
The web interface built into ESPHome also works as a fallback—just hit the ESP32’s IP address in a browser.
Was It Worth It?#
Absolutely.
My Hydrow went from unusable (100% drag is genuinely exhausting for more than a few minutes) to fully functional with adjustable drag. The repair cost under $30 and a few hours of work.
More importantly, I now have better drag control than the original:
- Home Assistant integration for remote adjustment
- Local potentiometer for quick changes mid-workout
- Visual feedback on the OLED
- No dependency on the Hydrow’s software for this function
The original touchscreen drag slider still appears—it just doesn’t do anything anymore. The Hydrow software works fine otherwise: classes stream, metrics track, leaderboards update. Only the drag control has moved to my ESP32.
Could Hydrow Have Fixed This?#
Probably, with a board replacement. But the cost would have been substantial, and I’d still have a single point of failure in their proprietary system.
This fix is repairable. If a MOSFET fails, I replace a $1.50 component. If the ESP32 dies, I flash a new one in minutes. I have the schematic, the code, and the knowledge to maintain it indefinitely.
That’s the value of understanding your equipment at this level. You’re not dependent on manufacturer support, warranty coverage, or parts availability. You own the solution.
This post documents a repair I performed on my own equipment. Attempting similar modifications will void your warranty and carries risk of equipment damage or injury. 48V can deliver a painful shock. Work carefully, verify your connections, and understand what you’re doing before applying power.